Optical Comparator (Profile Projector)
What is Injection Molding and How Does It Work?
Injection molding works by molding liquidated materials and heating them to solidify the final form. From electrical appliances, surgical preparation products, and beverage containers, injection molding is a leading method for manufacturing.
Injection molding makes great results if processed correctly, but a misstep could be detrimental to the final product. In this article, we’ll learn more about injection molding, the process, and frequent injection molding defects.
What is Injection Molding
Put simply, injection molding is a forming process of injecting a mold with liquid plastic or metal, clamping it, and then cooling it for a final product.
Injection Molding Process
Step 1:
The first step in injection molding is putting metal or plastic pellets into the machine’s hopper. Once the hopper is filled with pellets, the pellets travel into the cylinder.
Step 2:
The next step is heating the cylinder. The cylinder is the injection molding machine’s compartment that heats the pellets for molding preparation. Once the cylinder heats the material to liquidation, the liquid flows out of the nozzle.
Step 3:
Third, the nozzle injects the liquidized material through the attached mold channel, referred to as the sprue, and into the mold cavity like a syringe.
Step 4:
Once the material shoots through the sprue and into the mold cavity, the mold cools and hardens into a formed shape. After it adequately cools, the machine releases the formed molded material.
Step 5:
Lastly, the sprue is removed from the final part. Finishing techniques are also applied to make the final product look nice and function well.
Common Injection Molding Defects
Weld Lines
Weld lines are thin streaks on the molded material, identifying where the material merged along the split in the mold. These injection molding defects decrease the molded part’s strength and can produce burns or bubbles.
The defect occurs when the resin solidifies too early during merging. There are three solutions to prevent weld lines:
-
1Increase the temperature of resin or mold
-
2Increase the injection speed or pressure
-
3Adjust the gate position and holding pressure
Cracking and Mold Sticking
Cracking and mold sticking is a lump in the mold that makes the entire mold crack. This injection defect occurs when mold release resistance is too high.
There are three solutions for fixing cracking and mold sticking:
-
1Decrease injection pressure
-
2Decrease resin or mold temperature
-
3Decrease ejection speed
Voids (Bubbles)
Voids, also known as bubbles, appear as little holes inside the molded part. These injection molding defects occur when the pressure is not set correctly for the mold.
Here are some common solutions for fixing voids:
-
1Decrease thickness
-
2Adjust gate position
-
3Increase mold temperature
-
4Decrease cylinder temperature
-
5Increase injection pressure
Sinkage
Sinkage is depressions on a molded part’s surface. It happens when pressure is incorrectly transmitted to the mold cavity.
Four solutions for preventing or fixing sinkage are:
-
1Investigate resin and review if there is enough for the entire mold cavity
-
2Increase resin or mold temperature
-
3Evaluate leakage, clogging, and possible contamination
-
4Asses the air vents for errors
Flashing (Flash/Burrs)
Flash or burrs occur when resin seeps out of the mold seams. Injection molding defects like flashburrs may be a result of too much resin or not enough.
Five possible solutions for fixing flash/ burrs are:
-
1Evaluate resin: too much? Too little?
-
2Decrease injection pressure and speed
-
3Ensure the mold is clamped tight enough
-
4Lower resin or mold temperature
-
5Find and fix chips, scratches, or fatigue in the mold
Short Shot (Filling Failure)
Short shot errors mean that the resin didn’t fill the cavity all the way.
There are five possible solutions:
-
1Check for sufficient resin
-
2Assess injection pressure and speed
-
3Review resin and mold temperature: make sure it isn’t too low
-
4Review for resin leakage or clogging or foreign objects
-
5Review errors in the air vent
Black Spots
Black spots are impurity spots on the molded part that look brown or black. These spots occur from contamination. There are two solutions:
-
1Perform frequent purging
-
2Ensure cleaning after screw extraction
Gate Remnants
Gate remnants are extra remnants in the tunnel and pinpoint gates. These remnants occur when the gate remainder is inadequately processed.
This problem has four possible fixes:
-
1Change gate shape
-
2Increase speed for opening mold
-
3Increase cooling time
-
4Decrease holding time
Burning
Burning is discoloration on a molded part that appears black or brown. Burning injection molding defects are different from black spots because it does not result from contamination and appear in streaks. They are, instead, burned results from the air being compressed at too high temperatures.
Countermeasures for burning:
-
1Increase air venting
-
2Inspect clogging of air vents
-
3Change gate position
-
4Lower injection speed
Warpage, Deformation
Warpage is a type of molded part deformation that results from residual stress.
Solutions for preventing warpage include:
-
1Decrease ejection speed
-
2Decrease temp of resin or mold
-
3Decrease injection pressure
-
4Review thickness
Silver Streaks
Silver streaks occur from insufficient drying or mold contamination from the air or foreign objects.
Here are a few solutions for preventing or countering injection molding defects like silver streaks:
-
1Increase drying time
-
2Decrease injection speed
-
3Increase injection pressure
-
4Increase holding pressure
-
5Review for contaminates
Jetting
Jetting is also one of the injection molding problems resulting in a streaked appearance. However, it looks more squiggly than a silver streak. Jetting also results from resin jumping forcefully during initial molding, which is different from streaking.
Possible fixes for jetting are:
-
1Increase temp of resin or mold
-
2Decrease injection speed
-
3Expand the gate
Flow Marks
Flow marks are tree ring shapes streaks on the surface of molded parts around the gate.
Solutions for flow marks are:
-
1Increase temp of resin or mold
-
2Increase injection speed
-
3Increase injection pressure
-
4Expand the gate
Moving Past Injection Molding Problems
Although there is a significant list of injection molding problems, it is still a widely used process across industries like automotive, aerospace, food/beverage, and medical. Using the right machine, monitoring the process carefully, and proactively solving any injection molding problems ensures that your project will go smoothly.
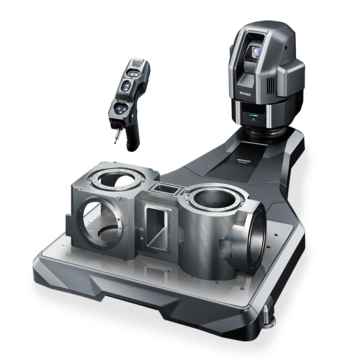
KEYENCE’s instant measurement systems ensure that the dimensions and shape of a plastic molded product are as intended and help facilitate the molding process.
Related Downloads